Reclaimed Flat Bar Shelves
A tutorial by
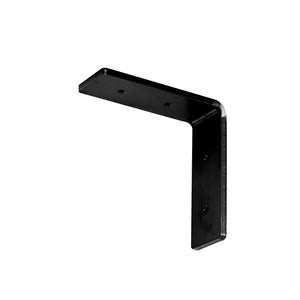


Step 1:
Prep and paint your shelf brackets
If you are using raw steel brackets and are planning to paint them (like I did), use the Scotch-Brite pad and some acetone to remove the rust inhibitor oil from your raw shelf brackets. Spray the undersides of the bracket (the part that will be visible when the shelves are up) evenly, and let dry for a minimum of 30 minutes.

Step 2:
Measure and cut shelves to size
Measure each board to your desired shelf length- mine are each 4 feet long. Line up your circular saw blade with the mark you created along the edge of the board and scootch your square up beside it. Use 2 clamps to hold your square in place and use your circular saw to make the cut.

Step 3:
Prep your shelf surface
This step may vary based on what material you use for your shelves. I wanted to maintain the look that my boards already had, so I simply used my orbial sander and 220 grit sandpaper to smooth down the edges and any splintering spots.

Step 4:
Attach brackets to shelves
Measure and mark 12” from each end of each shelf board. Line the center of each bracket up along these marks and use a square to make sure that they are flush with the back edge of your shelf. Use your drill and 1” screws to fasten the brackets to your shelves.

Step 5:
Attach shelves to wall
Use a stud finder to locate your studs. If possible, you’ll want to secure both brackets in studs for extra stability and support. When this isn’t possible, use strong wall anchors.
To hang each shelf, start by holding your first shelf at it’s desired height and drive a screw through the top fastner hole. While still holding your shelf up, use a level to ensure the shelf is straight and drive screws through the remaining holes. Repeat this process for your remaining shelves.